viernes, 1 de febrero de 2013
miércoles, 30 de enero de 2013
Aplicar velocidad a un movimiento rápido
En
este nuevo tutorial de animación, vamos a ver cómo aplicar un efecto de
velocidad a un movimiento rápido. Para ello, vamos a ver un truco del
magnífico mago Tod.
Este
tipo de efectos lo usaremos en acciones rápidas, para dar fuerza y
velocidad al movimiento. El truco consiste en crear una estela o
deformación en 2 o 3 fotogramas que sigue al movimiento principal.

Tod, nuestro mago está dispuesto a mostrarnos un truco de desaparición. Su primer movimiento será sacar el pañuelo del bolsillo de una manera rápida y elegante. Luego, de una manera muy sutil subirá el pañuelo desde el suelo hasta la cabeza desaparieciendo en el momento.
Estos son los primeros fotogramas claves de la acción.

Primer
punto a resolver. Tod saca el brazo derecho para coger el pañuelo.
Teniendo los dos primeros claves de referencia, inserto algunos claves
más solucionando cómo es el movimiento. Pensando que es un movimiento
rápido, necesito que se vea como sale el brazo y como llega. lo que pasa
en el medio lo soluciono con el blur.
Claves para el primer movimiento.
Claves para el primer movimiento.

La
clave es dar en número necesario de fotogramas de arranque y de
llegada. En este caso, en 2 fotogramas sale el codo y en 2 fotogramas se
coloca la mano. En medio. he dibujado una forma que une el codo y la
mano con y marca el recorrido que hace el brazo para llegar a su
posición final.A esta forma le he dado una duración de 2 fotogramas.

Este es el resultado de este primer movimiento.
Veremos más sobre esta animación en el siguiente tutorial.
Diseñar cabeza de Koala (Ilustrator CS4) (inglés)
We’re going to put those vector eyes you learned how to make
not long ago to some good use! This tutorial will show you how to
combine basic shapes with some clever coloring and blending to make a
fantastic looking koala character.
We’ll use some opacity masks, brushes, gradients and effects, in addition to an easy shading technique you’ll find yourself using in plenty of other projects. Get ready to tuck into this Aussie-flavored tut!
With the Ellipse Tool (L) selected hold Alt + Shift and drag out a circle in the middle of your document. Using the Direct Selection Tool (A), move the top point down and raise the two side point’s upper handles to create the shape below.
Click on the small white arrow next to the thumbnail to show the paths of this layer. Double-click the path you just created and name this layer "head." Using the Pen Tool (P) we are going to create a shaggy ear. Here is a great resource to gain familiarity with the Pen Tool, if required. Name this layer "ear L."
Use the points and handles as before to create a squarish koala-esque nose. The key here is to raise and lower the top and bottom points of the circle, move the two side points in towards the middle and stretch out the handles of each point until you have something that looks like the image below.
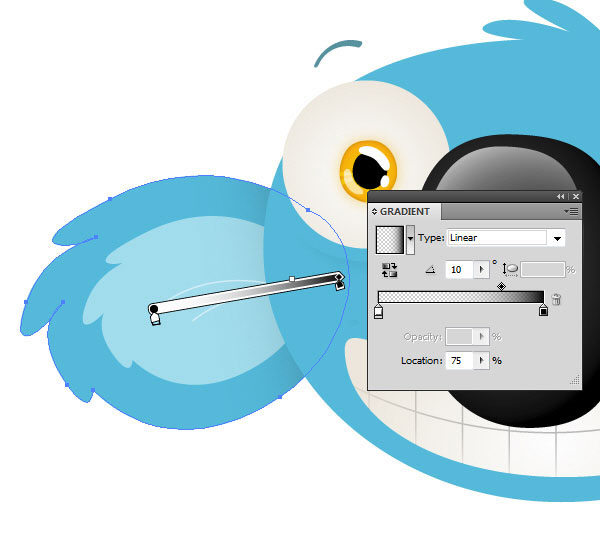
Now move the small diamond slider in the middle to a Location Value of 75% (towards black). This will increase the area of the gray on the nose. To conform the shape of the gradient to the nose, select the Gradient Tool (G) and make adjustments as shown below.
Head back over to the Gradient Palette and change the first slider from gray to white and change its opacity to 0%. Change the other from black to white. Change the location of the diamond slider to 80%. Using the Gradient Tool (G) position the gradient as demonstrated below.
Use the Selection Tool (V) to select the eyebrow, go to Object > Expand Appearance. Change the color to #007787, then use the same method as with the ear to vertically flip the eyebrow and move it over to the other eye.
Now select the line and while holding Alt + Shift, drag a duplicate of that line one tooth-distance over. It’s up to you how large your characters teeth are! Now press Command +D (Transform Again) to have Illustrator automatically repeat your last action, until there are an appropriate number of teeth lines across the mouth. Group these lines (Command + G).
Duplicate this and position the two circles over the freckles as shown below. Notice the blurred white dots on the opacity mask – this is how your gradient circles should appear. Leave the opacity mask.
Adjust how much of the blurred circle is covered by the black circle within the mask to vary the strength of the shadow, and use the opacity levels to reach a subtle but effective level of shading.
Paste the ear in place (Command +F) and give it a Linear gradient, from white to black. Set the gradient’s angle to 10 degrees, and the diamond slider to 75%. Set the white to 0% opacity. In the Layers Palette, move this new ear layer down until it is below the “head” layer, and above the ears. Set it to Multiply and 60% opacity.

We’ll use some opacity masks, brushes, gradients and effects, in addition to an easy shading technique you’ll find yourself using in plenty of other projects. Get ready to tuck into this Aussie-flavored tut!
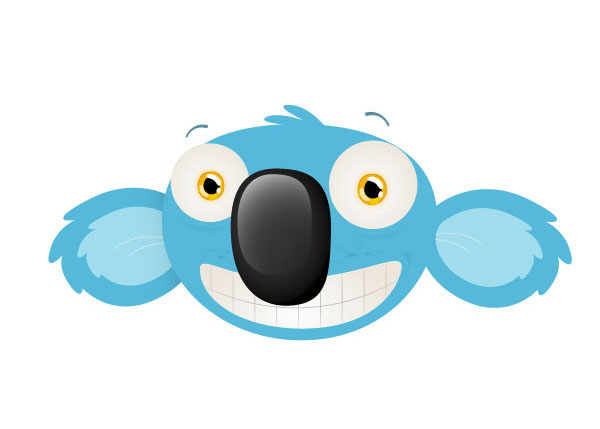
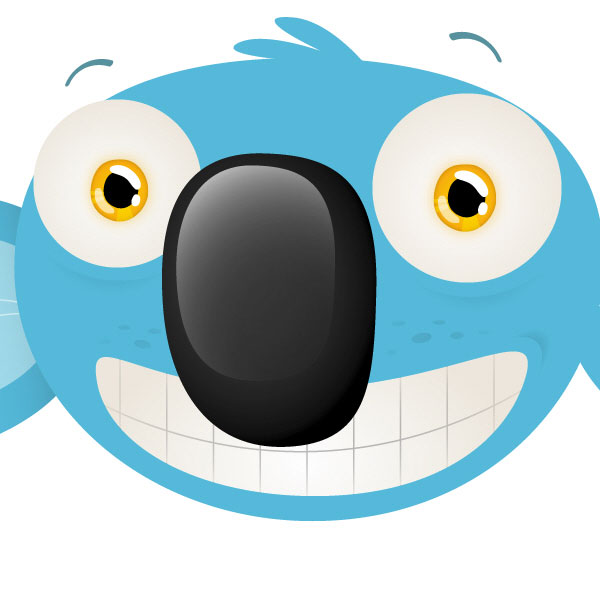
Final Image Preview
Below is the final image we will be working towards. Want access to the full Vector Source files and downloadable copies of every tutorial, including this one? Join Vector Plus for just 9$ a month.Tutorial Details
- Program: Illustrator CS4
- Difficulty: Intermediate
- Estimated Completion Time: 30 – 40 minutes
Step 1
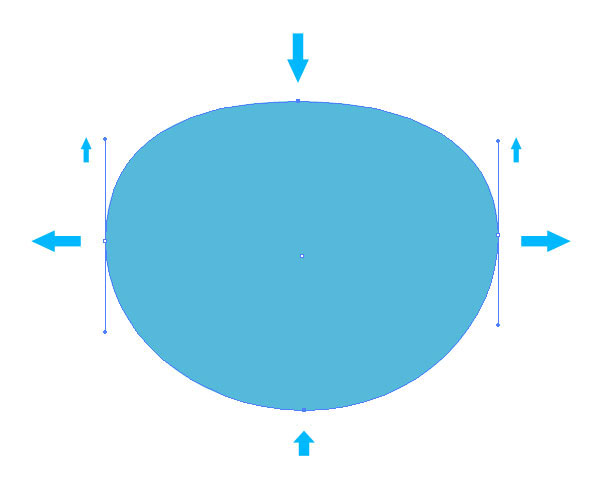
Open a new 900px by 700px document, set it to RGB, at 72 dpi. Let’s start by creating the basic head shape! We are using blue as our base color here, but obviously color choice is entirely up to you. Be sure to save (Command + S) with each step. By double-clicking Fill on the color Palette (F6), change the fill color to a nice blue; we used #33BBDB.With the Ellipse Tool (L) selected hold Alt + Shift and drag out a circle in the middle of your document. Using the Direct Selection Tool (A), move the top point down and raise the two side point’s upper handles to create the shape below.
Step 2
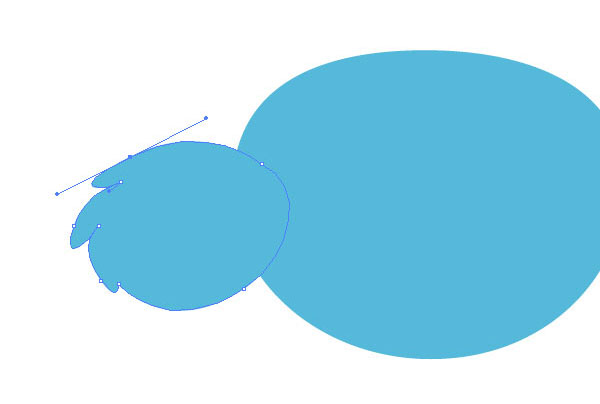
To get into a good habit from the outset, let’s name our layers! We will suggest layer names at the beginning, but we encourage you just to use whatever makes sense to you. In your Layers Palette double-click “Layer 1″ and name this layer "koala."Click on the small white arrow next to the thumbnail to show the paths of this layer. Double-click the path you just created and name this layer "head." Using the Pen Tool (P) we are going to create a shaggy ear. Here is a great resource to gain familiarity with the Pen Tool, if required. Name this layer "ear L."
Step 3
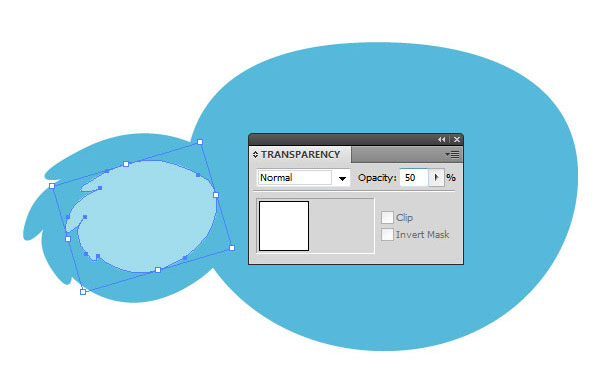
To create an inner ear simply select "ear L", Copy it (Command + C) and Paste it in place (Command + F). Change the Fill to White. Bring up the Transparency Palette (Shift + Command + F10) and change the Opacity to 50%. Name the layer "inner ear."Step 4
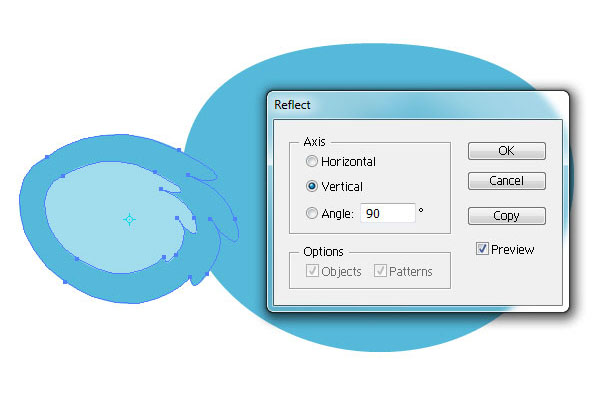
Select both ear layers and Group them (Command + G). Name this group "ear L." Choose the Selection Tool (V) and select this group. Ensure that the Reflect Tool is selected (O) and double-click its icon on the toolbar (below the Eraser). This will bring up the Reflect Dialogue box. Select Vertical as the axis and choose Copy. This will create a vertically flipped copy of the ear.Step 5
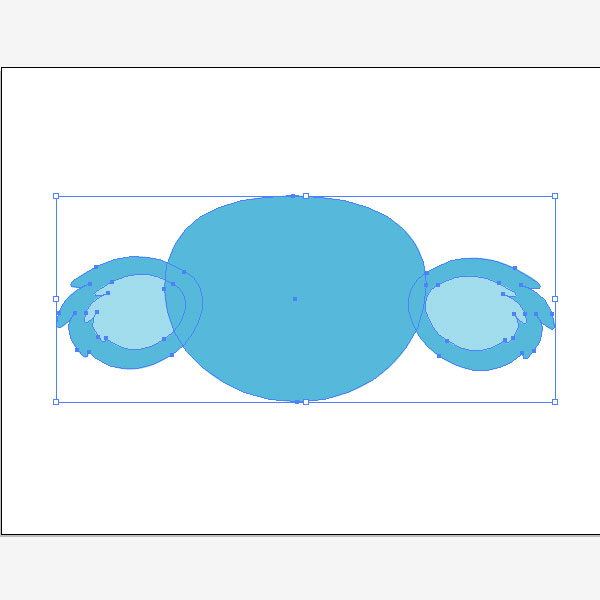
Using the Selection Tool (V), move the flipped ear over to the other side of the head and change its name to "ear R." In your Layers Palette move the "head" layer above both ear layers. Notice that the left ear is positioned closer to (or further behind) the head than the right – this will give our koala’s head some dimension by giving the illusion of roundness.Step 6
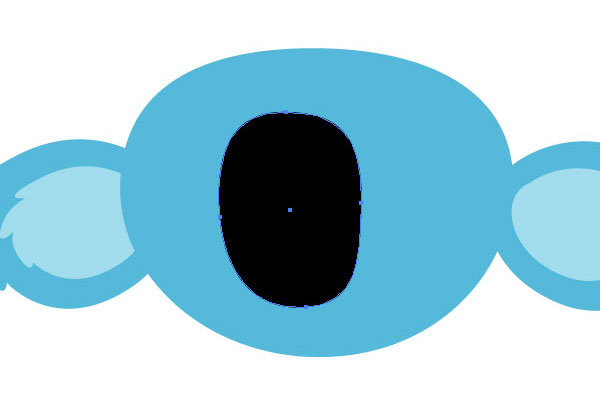
Next let’s make the nose! As with the head, start with the Ellipse Tool (L) and create a perfect circle (hold Alt + Shift) in the middle of the head. Change its Fill to Black and name it "nose."Use the points and handles as before to create a squarish koala-esque nose. The key here is to raise and lower the top and bottom points of the circle, move the two side points in towards the middle and stretch out the handles of each point until you have something that looks like the image below.
Step 7
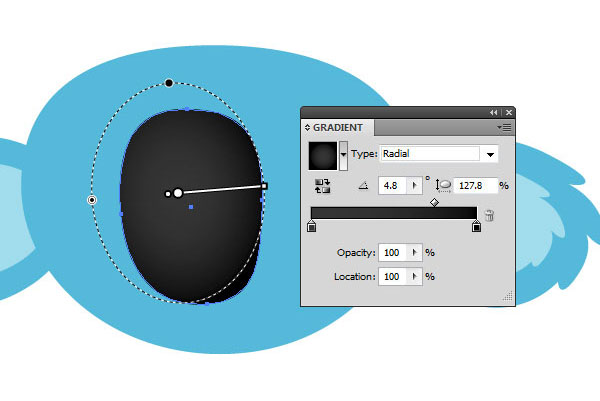
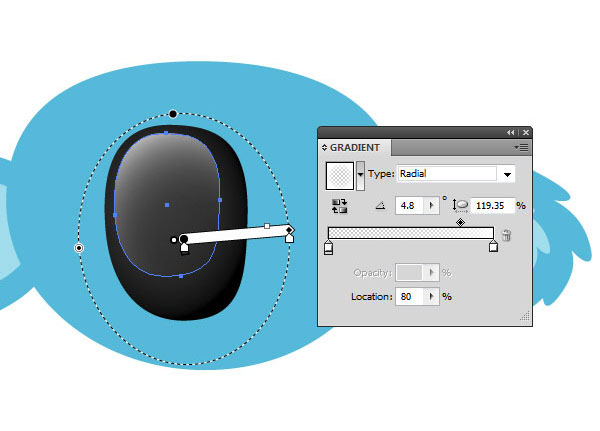
Give the nose some depth by giving it a black to gray gradient. To do this select the nose shape, bring up the Gradient Palette, select Radial as the gradient Type and double-click the first color slider to change its color to gray (R=50, G=50, B=50) and the other black (R=0, G=0, B=0).Now move the small diamond slider in the middle to a Location Value of 75% (towards black). This will increase the area of the gray on the nose. To conform the shape of the gradient to the nose, select the Gradient Tool (G) and make adjustments as shown below.
Step 8
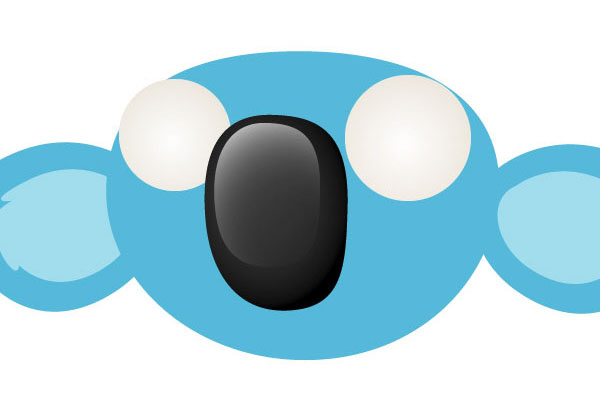
To give the nose a bit more life (it looks quite flat and dull) we will add a very simple reflection. Copy (Command + C) the nose and Paste in place (Command + F). Using the Selection Tool (V), resize and reposition the shape up towards the top left of the nose.Head back over to the Gradient Palette and change the first slider from gray to white and change its opacity to 0%. Change the other from black to white. Change the location of the diamond slider to 80%. Using the Gradient Tool (G) position the gradient as demonstrated below.
Step 9
Now for the eyes. Create a perfect circle using the Ellipse Tool (L) next to the nose and give it a radial gradient of white (R=255, G=255, B=255) to beige (R=237, G=231, B=221). Duplicate (Command +C an Command +F) this circle, move it over to the other side of the nose and make it slightly smaller. Move these two layers below the nose in the Layers Palette and name them appropriately.Step 10
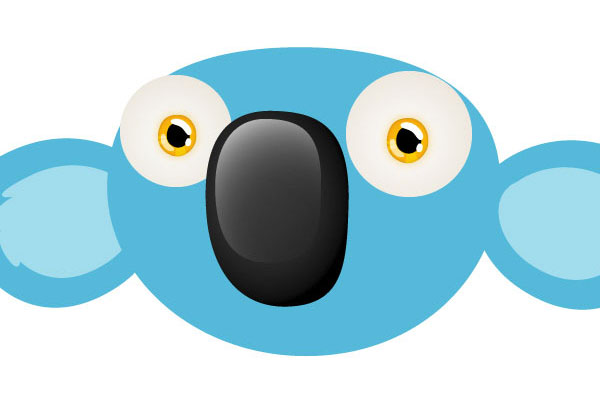
These eyes need irises, and we’ll be using our previous tutorial Create a Set of Shiny Character Eyes to make these. Again, you can choose any color – here we have used orange. Place your irises as shown below.Step 11
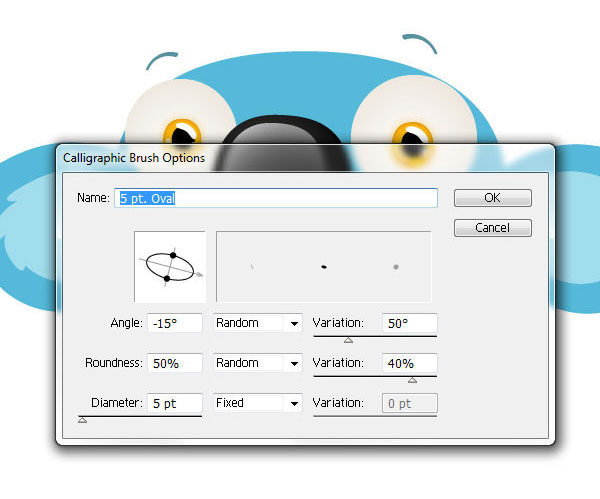
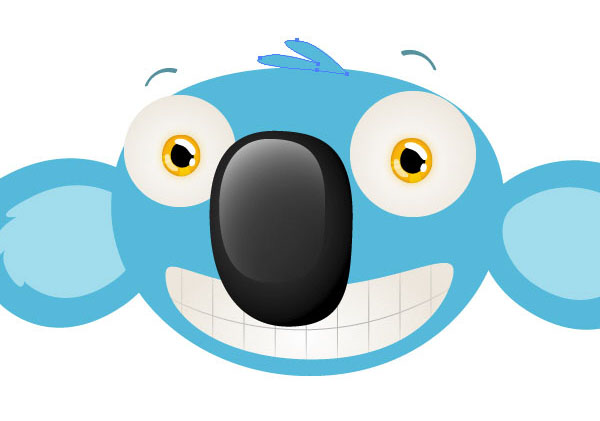
Some quick eyebrows can be made easily by using one of the default calligraphic brushes from the Brushes Palette (F5) with the settings shown below. Use the Brush Tool (B) to draw one eyebrow, Undo (Command +Z) and redraw until you are happy with the result.Use the Selection Tool (V) to select the eyebrow, go to Object > Expand Appearance. Change the color to #007787, then use the same method as with the ear to vertically flip the eyebrow and move it over to the other eye.
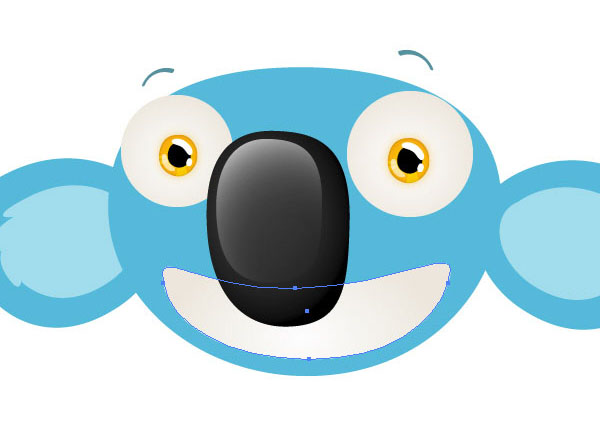
Step 12
The mouth is probably the most complex part of this tutorial, and it’s really quite straightforward. Start by creating an ellipse under the koala’s nose, much like a sausage shape, using the Ellipse Tool (L). Edit its points until you have something like the image below. Use the Eyedropper Tool (I) to grab the gradient from one of the eyes – this’ll do nicely for our mouth.Step 13
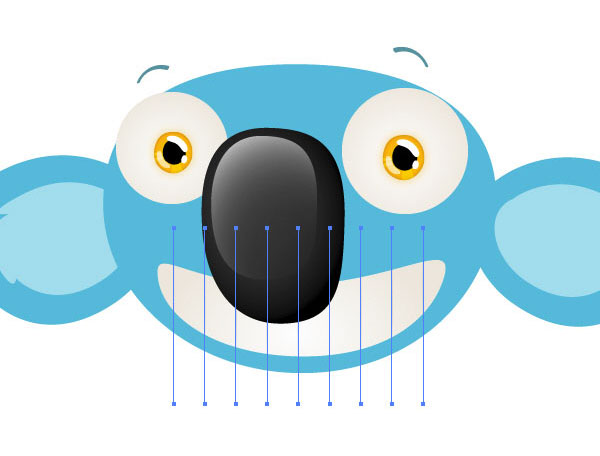
Next, using the Line Segment Tool (\), create a single line near the left of the mouth with a Black, 1pt Stroke. Use the Stroke Palette (Command + F10) to change these settings.Now select the line and while holding Alt + Shift, drag a duplicate of that line one tooth-distance over. It’s up to you how large your characters teeth are! Now press Command +D (Transform Again) to have Illustrator automatically repeat your last action, until there are an appropriate number of teeth lines across the mouth. Group these lines (Command + G).
Step 14
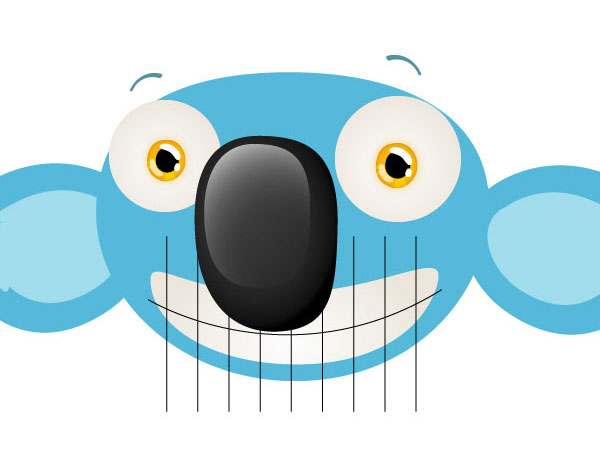
Using the Pen Tool (P) add a curved line from one edge of the mouth to the other, with the same stroke settings as the other lines. Group this with the other lines and call this group “teeth.” You should have something like the image below.Step 15
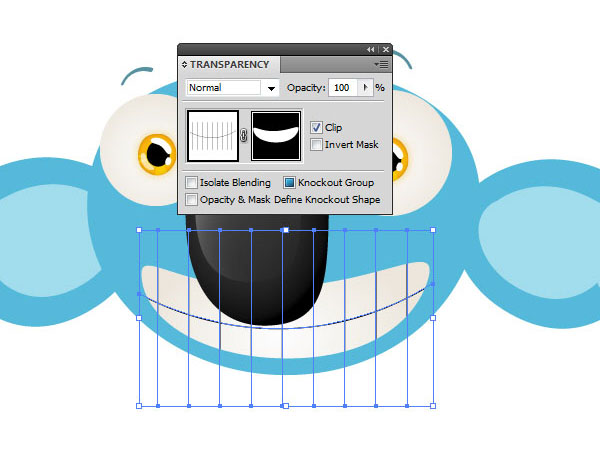
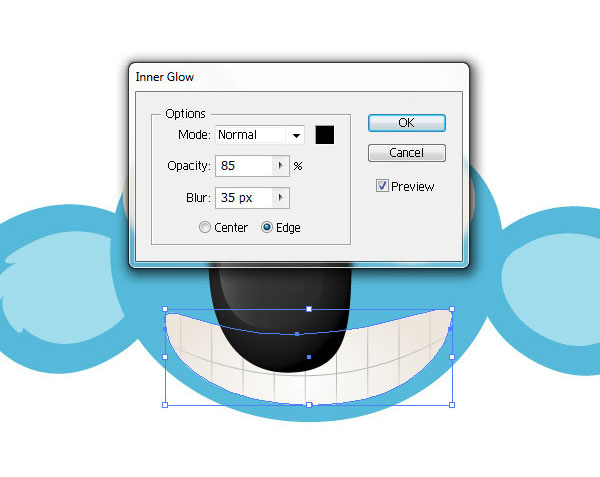
Let’s create an opacity mask, to conform the teeth to the shape of the mouth. Select the mouth and Copy it (Command + C). Then select the teeth group, open your Transparency Palette (Shift + Command + F10) and double-click the empty space next the group’s thumbnail image. Your teeth lines will disappear and a black square will appear where you clicked. Paste in place (Command + F) to bring the mouth shape up, and change its Fill color to white. This reveals your teeth group once again. You can exit the opacity mask by clicking on the thumbnail next to the mask.Step 16
To soften the lines of the teeth, drop the Opacity of the teeth group to 40%. Then, entering the mask again, select the mouth shape and apply Effect > Stylize > Inner Glow. Ensure the settings are as below, and the mouth is done!Step 17
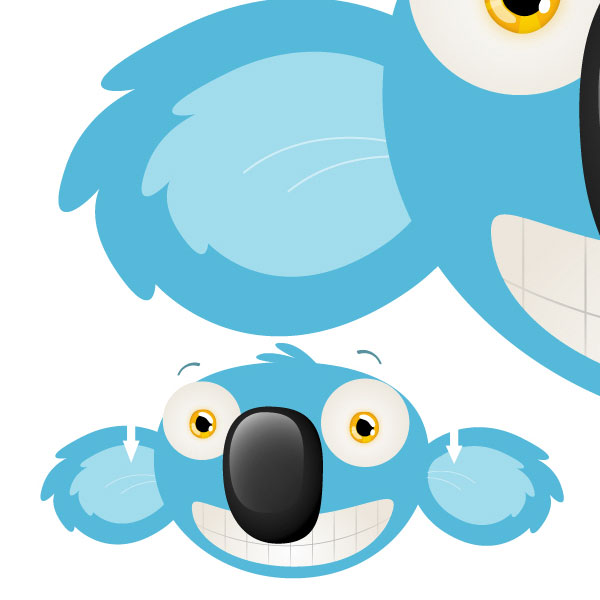
We are nearly finished, just a few final touches! With the Pen Tool (P) give your koala some hair, to make him/her a little cuter.Step 18
Using the Pen Tool (P) again, draw a curved line as shown below, with a stroke color of white and 1pt thickness. Set the Opacity to 50% and duplicate it four times to look like the image below.Step 19
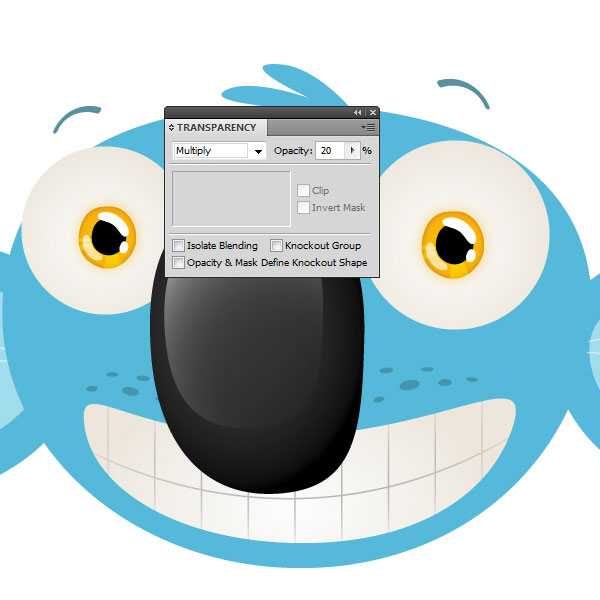
For some freckles create a series of small ellipses on the cheeks of the koala using the Ellipse Tool (L) and Selection Tool (V). Group them and change the Fill color to black, Blend Mode to Multiply and Opacity to 20%.Step 20
Soften these freckles by selecting the group and creating an opacity mask (as before, double-click the area on the Transparency Palette next to the thumbnail). This time create a circle with the Ellipse Tool (L) and give it a radial black to white gradient.Duplicate this and position the two circles over the freckles as shown below. Notice the blurred white dots on the opacity mask – this is how your gradient circles should appear. Leave the opacity mask.
Step 21
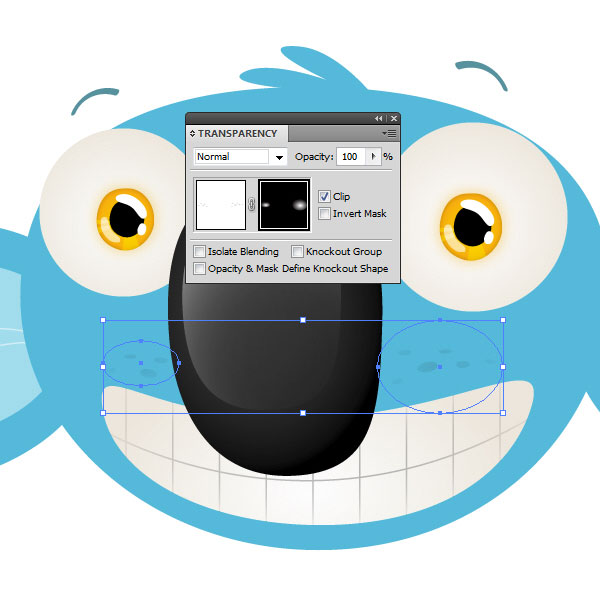
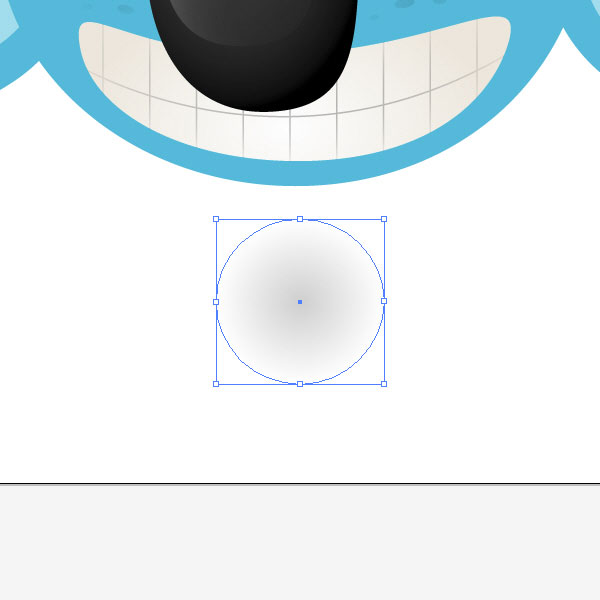
Our koala is rapidly nearing completion; we’ll just add some subtle shading. The method we’ll use here is a nice technique that you can use easily for other projects. Simply create yet another ellipse anywhere on the stage – approximately as big as one of the eyes. Jump to your Gradient Palette and give it a black to black radial gradient, and set the second slider’s opacity to 0%. Set the circle’s Blending Mode to Multiply and the Opacity to 20 – 30%.Step 22
Keep the circle selected and create an opacity mask. There are two check boxes next to the opacity mask: Clip and Invert Mask. First uncheck Clip, then create a black ellipse (L) over the first circle you made. Stretch it out slightly as shown and allow the bottom of the blurred first circle to peek out. The image demonstrates this. Exit the opacity mask.Step 23
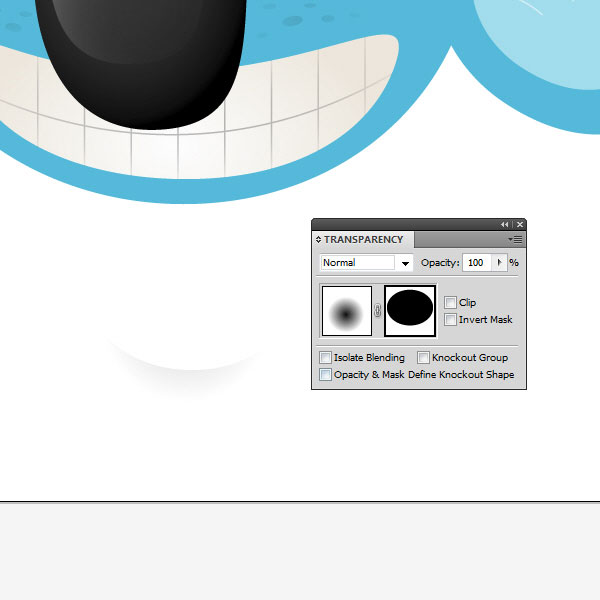
What we have now is a stretchable, rotatable portion of shading that we can use to give depth to under the eyes and near the mouth. Place the shading underneath the eyes in such a way that the curves of each match smoothly.Adjust how much of the blurred circle is covered by the black circle within the mask to vary the strength of the shadow, and use the opacity levels to reach a subtle but effective level of shading.
Step 24
For the final touch, double-click the left ear group to enter the group in Isolation Mode, and select the larger ear layer. Copy it (Command + C) and exit Isolation Mode (Click the green arrow in the top left of the screen or double-click any unoccupied portion of the stage).Paste the ear in place (Command +F) and give it a Linear gradient, from white to black. Set the gradient’s angle to 10 degrees, and the diamond slider to 75%. Set the white to 0% opacity. In the Layers Palette, move this new ear layer down until it is below the “head” layer, and above the ears. Set it to Multiply and 60% opacity.
Conclusion
You are done! Try importing your character into Photoshop to give it a final global lighting and color adjustment; and/or to add other elements, like a background. Thanks for sticking through this tutorial!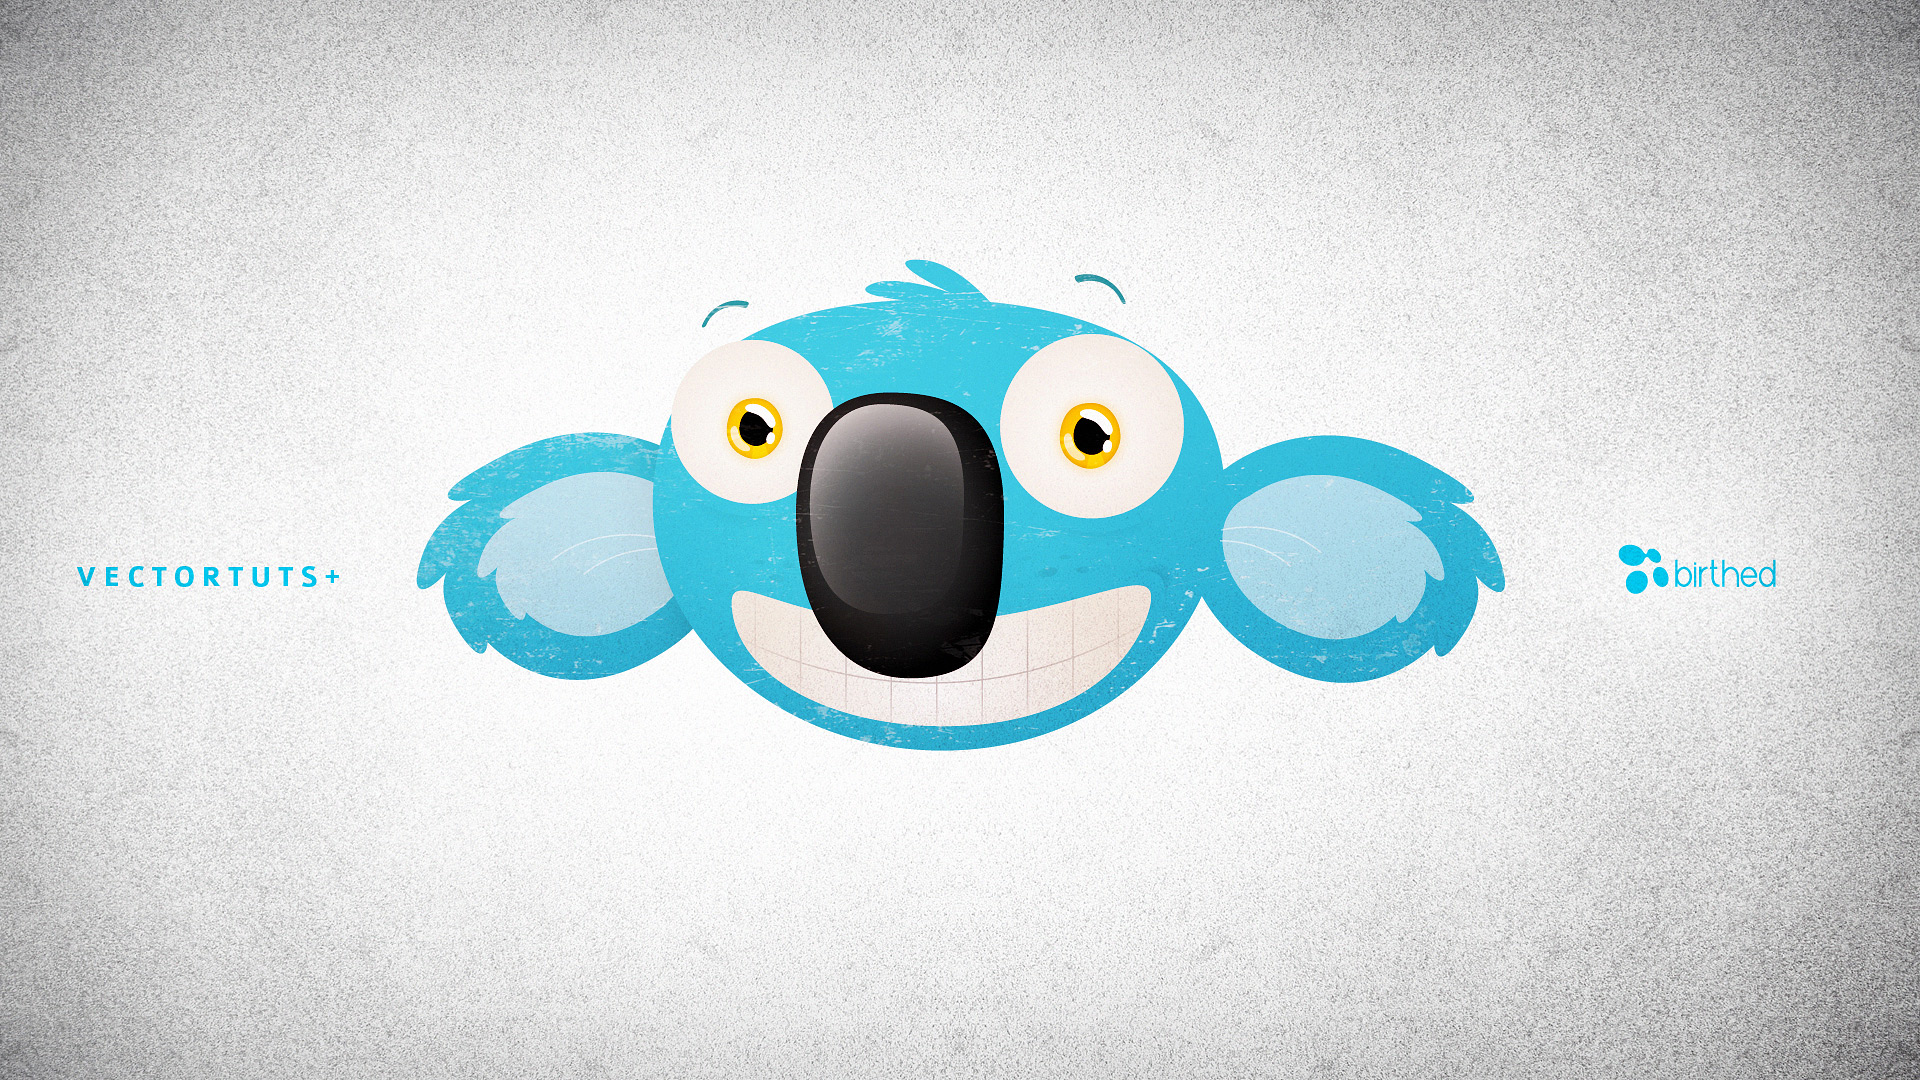
Números de fotogramas que hay que poner
La regla del 3
Siempre
que nos enfrentamos a una animación de acción reacción, surge una
pregunta. ¿Cuantos fotogramas le doy a este movimiento?.
Ante este problema, yo le recomiendo al que empieza en animación, una sencilla regla.
LA REGLA DElL 3.
LA REGLA DElL 3.
Vamos a poner el ejemplo de un cuadrado que cae desde una altura al suelo.
Lo primero es colocar el cuadrado en el punto de partida.

Este
cuadrado tardará un tiempo en llagar al suelo. Ese tiempo se traduce en
fotogramas. ¿cuantos fotogramas?. En principio, lo que hago es
simplemente marcar la posición en el suelo (primer contacto) unos
fotogramas por delante de la pose inicial, sin mirar cuantos.

Una
vez que tengo la posición inicial y la de primer contacto, aplico una
interpolación Clásica, con un -100 en la aceleración de caída.
Ahora,
haciendo play, puedo ver si la velocidad del cuadrado es acorde a la
distancia de caída y al supuesto peso que tiene el cuadrado.

En
mi caso, la caída ha de ser más rápida, por lo que la distancia entre
los claves ha de ser más pequeña. Moviendo el fotograma clave 2(primer
contacto), puedo ver como varía la velocidad de caída, y me quedaré con
la que más se ajuste a lo que quiero.

Ahora
viene la parte importante. La deformación del cuadrado y la
recuperación del mismo. Es aquí donde, si uno no tiene mucha
experiencia, no sabe cuantos fotogramas dar a cada fase. Es en este
momento donde aplicamos LA REGLA DEl 3.
Esto
consiste en marcar desde el fotograma clave 2(primer contacto), 3
fotogramas de deformación, dos fotogramas de parada en la posición de
máxima deformación, y 3 fotogramas de recuperación a su forma original.

Le
aplico interpolación clásica a la deformación y a recuperación, y ya
tengo un movimiento básico de reacción. Ahora variando el número de
fotogramas de cada fase, puedo ajustar la reacción del cuadrado en el
suelo en función de la velocidad de caída y el peso del cuadrado.

Es
importante tener en cuenta, a la hora de usar las interpolaciones
clásicas, que el eje de deformación (circulo blanco que aparece cuando
está en transformación libre) tenga la misma posición en todos lo
fotogramas clave. En mi caso el eje lo he puesto en la parte inferior
del cuadrado.
Otra
cosa a tener en cuenta es la velocidad de fotogramas. Esta regla
funciona muy bien a 25 fotogramas por segundo. Si usamos 12 fotogramas
por segundo, la cosa cambia, pero el proceso de empezar a marcar los
claves de posición primero y luego ajustar, funciona igual.
Esta
regla es aplicable a cualquier técnica de animación. Realmente es una
manera sencilla de tener un movimiento de reacción que podemos ajustar
luego en función de las necesidades de la animación.
Animación final del cuadrado.
Publicado 1st August 2010 por Juan Carlos Cruz
Diseñar un ojo con Flash


Selecciona la linea de contorno y con la herramienta de transformación simple (Q), + shift + alt, (escala manteniendo proporción y centro), escala el circulo para crear el iris.


Selecciona la linea de contorno del iris y escala el circulo hasta el tamaño ideal para la pupila. Rellena la pupila de color negro y elimina la linea de contorno.


Puedes diseñar ojos para diferentes personajes cambiando de color el radial del iris.
Animar un parpadeo (con el programa Flash)
A
la hora de animar un personaje, uno de los elementos más expresivos son
los ojos. Conseguir un buen parpadeo de ojos mejora la expresividad de
nuestro personaje.
Hay
diferentes formas de parpadear, según la actitud del personaje, el
parpadeo puede ser más lento o más rápido, con más deformación o con
menos. No es lo mismo si queremos mostrar que nuestro personaje está
despierto-activo, que si lo que queremos es que parezca cansado-pasivo.
En este tutorial veremos una forma de hacer un parpadeo de manera rápida y sencilla.
Primero
y antes que nada, necesito un personaje y los elementos necesarios para
la animación. En esta caso yo he cogido el personaje de Polillas
Acrobáticas y un unos párpados cerrados.

Todos
los elementos animales del personaje están separados por capas. De esta
manera, puedo mover cualquier elemento con total libertad.
Los ojos es otro elemento separados del resto. Es aquí donde vamos ha trabajar.

Convierto
el elemento ojos en un símbolo gráfico. Lo mismo con los párpados.
Ahora los dos elementos me aparecen en la librería junto al resto de
elementos que he convertido en símbolos.


Con
doble click sobre los ojos, entro en el símbolo de ojos. Aquí me
aparece una nueva línea de tiempo. La linea de tiempo de los ojos. Es
aquí donde animaré el movimiento de los párpados.

Antes de mover nada, le doy duración insertando un fotograba en la posición 20. Ahora tengo 20 fotograbas de ojos.
Le
doy nombre a la capa y creo una nueva por encima de esta llamada
párpados. Desde la biblioteca arrastro el símbolo párpados a esta nueva
capa y la coloco en la posición que le corresponde.

El primer fotograba de la capa de párpados lo dejo en blanco, sin contenido. En este fotograba no hay párpados.
La
duración que le quiero dar a los párpados cerrados es de 4 fotograbas.
Es el tiempo justo para que se note que cierra los ojos. Eso quiere
decir que en el fotograba 6 inserto un fotograba clave en blanco. Ahora
mismo, si movemos la cabeza lectora podemos ver de una manera simple
como cierra y abre los párpados.

Ahora
viene el truquito. Si os fijáis, sólo estamos usando una posición de
párpados.Los párpados cerrados. Lo que voy ha hacer es dar más
importancia a cómo abre los ojos para que no se note que faltan
posiciones de párpados, Así dibujo menos y termino antes jejeje. Bueno
el tema es el siguiente. Inserto un fotograba clave en el fotograba 2, 6
y 10.

En
el fotograma 2 de la capa de los ojos inserto un fotograba clave y lo
selecciono junto al de los párpados. Deformo los dos elementos
achatandolos a modo de cerrar párpados.

En
el fotograma clave 6 inserto una interpolación clásica. Ahora quiero
deformar los ojos en el clave 6 en forma vertical, pero quiero que el
eje de deformación esté en la parte inferior de los ojos. Para ello,
muevo el eje de deformación justo al cuadrado central de la selección.
lo mismo en el fotograba 10, para que durante la deformación, el eje
está en el mismo sitio. La deformación del ojo no tiene que ser muy
exagerada, pero tampoco muy tímida. Se tiene que notar, pero lo justo.

Bueno, casi está terminado. Ahora sol hace falta decidir cuando parpadea y cuando no.
Salimos del símbolo ojos. Ahora le doy una duración de 90 fotograbas a todas las capas que forman el personaje.

Selecciono
el primer fotograba de la capa de ojos, luego selecciono el elemento
ojos y en propiedades me fijo en LOOPING y en opciones selecciono SINGLE
FRAME en el fotograba 1. Esto hace que la animación de los párpados
anidada quede en pausa en el fotograba 1, justo en el punto donde no
hay párpados.

En
el fotograba 15 de la capa de ojos e inserto un fotograba clave.
Recuerda seleccionar el elemento para que salga la opción LOOPING. Ahora
en opciones selecciono PLAY ONCE y mantengo el 1. Esto hace que la
animación anidada se ponga en play solamente una vez. Cuando acaba la
animación inserto otro fotograba clave y vuelvo a poner SINGLE FRAME EN
1.

Si
racemes play en la animación, veremos cóm el personaje parpadea una
sola vez. El único problema es que las pupilas permanecen durante el
parpadeo. Esto lo arreglamos insertando fotograbas en blanco mientras
los ojos están cerrados.
Listo.
Si probamos la animación, nuestro personaje parpadea y nosotros
decidimos cuando. Lo bueno de esto es que la animación de parpadeo la
haces una vez sola para el resto de la animación.
http://vimeo.com/15040515
Suscribirse a:
Entradas (Atom)